


DIY Clear Vinyl Panels for Screened Porches: Materials, Tips & Tricks

A screened porch is one of the best places to relax at home—fresh air, natural light, and all the outdoor vibes without the bugs. But when cold weather, heavy rain, or strong winds hit, even the coziest screened porch can quickly go unused. That’s where clear vinyl panels come in. Installing marine-grade clear vinyl over your existing screens creates a weather-resistant enclosure that keeps the space warm, dry, and usable all year long. And the best part? You can absolutely tackle this as a DIY weekend project.
Clear vinyl porch panels are durable, flexible, and surprisingly simple to install, especially if you’re comfortable with basic measuring and fastening tools. Below, we’ll walk you through why clear vinyl works so well, how to choose the right gauge, the materials you’ll need, and a step-by-step guide to building panels that look clean and professional.
Why Clear Vinyl Panels Work
Clear vinyl is widely used on boats, patio enclosures, restaurants, and outdoor spaces because it offers the perfect mix of durability and visibility. When installed correctly, it can last for years—even through extreme temperatures.
Here’s why it’s a great option for screened porches:
Crystal-Clear Visibility
Unlike cheap plastic sheeting or hardware-store drop cloths, marine-grade clear vinyl is designed to stay optically clear. It won’t cloud, haze, or yellow in the sun. This means you keep your natural outdoor views while still sealing out the elements.
Long-Lasting Durability
Marine-grade vinyl is built for tough environments—sun exposure, rain, snow, fluctuating temperatures, and humidity. It’s strong enough to stay taut without tearing, even in windy conditions.
Flexible & Easy to Use
Clear vinyl softens as it warms up and becomes easy to roll up, snap open, or secure out of the way during warmer months. For many homeowners, this makes it more versatile than glass or acrylic panels.
Cost-Effective Weather Protection
Custom porch enclosure systems can cost thousands. A DIY clear vinyl project—especially using bulk rolls—can save a significant amount of money while still giving you a polished, custom look.
Choosing the Right Clear Vinyl
When buying vinyl, you’ll want to pay attention to two main factors: gauge (thickness) and UV protection.
Gauge (Thickness)
Clear vinyl is measured in gauge, ranging from around 8-gauge (very thin) to 60-gauge (very thick). For porch panels:
- 20-gauge – Flexible, lightweight, great for mild climates
- 30-gauge – More insulation, more durability, ideal for four-season use
- 40-gauge+ – Premium durability and protection, but heavier and more costly
Most DIYers choose 20–40 gauge because it strikes the right balance between durability and usability.
UV Protection
UV inhibitors prevent the vinyl from yellowing, drying out, or cracking. Marine-grade vinyl is treated to handle sun exposure and is the best choice for outdoor enclosures. Cheap vinyl without UV protection may only last one season.
Materials You’ll Need
Before you start, gather everything you need for cutting, reinforcing, and mounting your panels:
- Clear vinyl rolls (cut to size)
- Heavy-duty scissors or rotary cutter
- Straightedge or cutting mat
- Binding tape or marine-grade fabric edging
- Grommets, zippers, or Velcro (for fastening)
- Drill and screws
- Snap installation tool or grommet press
- Measuring tape, marker, and clamps
- Approved clear vinyl cleaners (for cleaning mounting surfaces)
Optional add-ons:
- Zippers for roll-up window sections
- Straps / tie-ups for summer storage
- Track systems for sliding panels
How to Install DIY Clear Vinyl Porch Panels
If you measure carefully and take your time, your finished panels will look clean and custom—even if you’re not a sewing expert. Many people complete this entire project over a weekend.
1. Measure Carefully
Start by measuring every screened opening on your porch. Since each one may differ slightly:
- Measure width at the top, middle, and bottom.
- Measure height on both the left and right sides.
- Add 1 inch to all sides to allow for overlap and hardware.
Write down each measurement separately to avoid mixing them up.
2. Cut Your Vinyl Panels
Lay your vinyl on a clean, soft surface—preferably indoors so it’s warm and pliable. Use:
- A rotary cutter for clean, straight lines
- A metal straightedge to guide cuts
- A fine-tip marker for marking dimensions
Tip: Warm vinyl is easier to cut and install when handled.
3. Reinforce the Edges
Raw vinyl edges can stretch over time. Reinforcing helps them last longer and gives your panels a finished, professional look.
You can reinforce edges in two ways:
- Binding tape (adhesive or heat-sealed)
- Sewn-on marine-grade edging (common on boat enclosures)
Reinforced edges also prevent stress points around your fasteners.
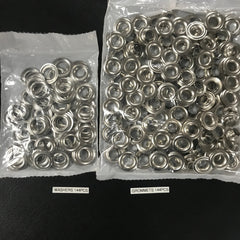
4. Add Your Fasteners
Snaps and grommets are the most common hardware for porch panels. Space them:
- Every 6–12 inches, depending on wind exposure
- Closer together on larger panels
Fastener options:
- Grommets – Strong, simple, and compatible with hooks
- Zippers – Ideal for doors or roll-up windows
- Velcro strips – Good for lightweight or temporary installs
Take your time installing fasteners—straight lines and even spacing make a big difference in the final look.
5. Mount the Panels to Your Porch Frame
Once your hardware is attached to the vinyl, secure the corresponding hardware to your porch posts or trim.
- Wood frames: Use stainless steel screws
- Aluminum frames: Use self-tapping screws
Make sure the vinyl is taut but not overly stretched. A small amount of give allows for temperature expansion.
6. Test Roll-Up Options (Optional)
If you want seasonal flexibility, consider adding:
- Horizontal zippers to open a “window”
- Roll-up straps to secure the panel overhead
- Quick-release snaps for fast removal
This allows you to enjoy airflow on warm days without removing the entire panel.
Tips & Tricks for a Successful Install
These small details will make your DIY enclosure look better and last longer.
- Warm the vinyl before cutting or installing. Leave it in the sun, or bring it indoors for a few hours.
- Avoid folding. Always store vinyl rolled—not folded—to prevent creases.
- Clean with mild soap and water. Avoid ammonia or harsh cleaners that can damage clarity. Use a Flexa approved clear vinyl cleaner.
- Use stainless steel hardware. It won’t rust, especially in humid climates.
- Label each panel. This makes seasonal reinstallation fast and easy.
- Consider adding ventilation. Roll-up sections prevent condensation and let you enjoy fresh air.


Leave a comment
This site is protected by hCaptcha and the hCaptcha Privacy Policy and Terms of Service apply.